Cowboy boots are considered one of the few durable and quality boots that are manufactured today. The heel and sole of the boot, on the other hand, is the most exposed part as they’re at the bottom. And with this exposure, you will see that it is not as durable as the other parts.
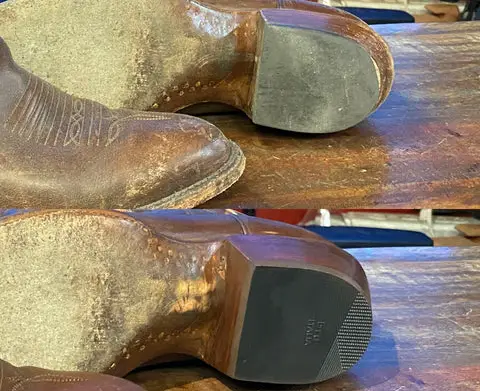
The most obvious evidence that a cowboy boot needs heel replacement and resoling is when there are holes in the outsoles, the heels wear down, and the nails are exposed. In this situation, mending is essential.
A heel replacement on your boots will cost you between $10 and $40 to repair. And a reasonable rule of thumb is that if there is even 2 millimetres of plastic on the heel, it can be replaced but anything less than that, and you might want to start looking to purchase a new one.
Soles and heels are often fixed together for $30 to $80 depending on the place you’re taking it for replacement.
But just replacing your heels won’t do if your boot soles also need replacement.

Can you replace the heels and soles of your boots at home?
Yes, you can indeed replace the heels and soles of your cowboy boots at home provided there is not much damage, because if it is too damaged, you probably might want to take it to a professional instead of damaging it further.
Anyway, let us start with the process-
1.) Get your kit ready to start with the repairing process.
The first step is to get your cowboy boot repair equipment ready. Cowboy boot repair takes a lot of time and work, so be sure you have the necessary equipment in your repair bag.
2.) Disassemble the cowboy boot carefully.
Carefully remove the heel cap with pliers and using the metal scraper, you may remove the heel foundation. Remove all of the nails from the cowboy boots’ heels. Remove the old sole with pliers while cutting it off with a tiny knife.
Check that all of the nails on your boot’s outsole have been removed.
3.) Sanding should be done properly.
Sand the sole of your cowboy boot thoroughly. Prepare the new outsole to be more noticeable than the previous one. Rubber can be used, and the thickness should be roughly 4mm. Make sure you’ve removed all of the stitches from the sole to make room for the new ones.
4.) Clean the soles so that no dust remains.
Clean the midsoles and outsoles thoroughly with acetone. If your boot has a midsole, wipe it well with acetone before using a new layer midsole.
5.) Roughen the midsole for better grip.
You may notice that the midsole is smooth, try roughening it up. This is done to check that the midsole’s adhesiveness has grown. Smooth surfaces do not adhere strongly when the sole is fixed. Use a rough spot or a rough scrap to massage it.
6.) Attach new soles and place them properly.
Apply a specific adhesive to the cowboy boot soles after roughening the surface and washing thoroughly. Then, gently connect the sole to the boot, making sure it is securely fastened.
Cut off the access to the replacement sole with a sharp knife or sharpening. Because the new sole is hard, the process is challenging.
After cutting, use sandpaper to smooth down the edges of the new sole for a flawless fit. Stitch the new sole securely to the cowboy boots using a special sewing thread.
Nail the concave section in the middle of the sole. The method is also rather challenging, but proceed with caution and patience.
7.) Apply glue on the heel area and attach it.
At this point, you should connect the heel to the boots. To attach it, wipe the outsole and use a marker to measure the regions or borders of your heel. Then, lightly apply adhesive to the parts of the outsole where the heel will be affixed.
8.) Use a piece of leather to attach the heel.
Cut a piece of leather the same size as your heel. Apply adhesive to the inside heel sole as well as one side of the leather. Attach them and apply some force with a hammer or a stick well. If the leather piece is larger in any way, trim it to fit the heel size.
9.) Bind the heel to the outsole.
Attach the heel to your outsole where you previously bonded it. To make sure it is securely stuck, apply some pressure or strike it softly with a hammer. You may now insert nails and gently strike them. Check that the heel and outsole are linked.
How much will it cost to replace the heels and soles at home?
Simply put the soles together with a special shoe adhesive which costs less than $15, making it a significantly less expensive option than purchasing new boots.
Check out this adhesive for boots and shoes by Shoe Goo Repair Adhesive–
- Shoe Repair and Protective Coating for Leather, Vinyl, Rubber or Canvas
- Bonds, protects and rebuilds for a permanent repair
- Excellent sealant – Perfect for patching Small holes
- Waterproof – Bond remains secure even when exposed to Water
- Creates extra traction – can even be used on skateboards
- Sof S
Prices pulled from the Amazon Product Advertising API on:
Product prices and availability are accurate as of the date/time indicated and are subject to change. Any price and availability information displayed on [relevant Amazon Site(s), as applicable] at the time of purchase will apply to the purchase of this product.
If just the heels of your boots are damaged, you can replace them. The heel of a high-heeled shoe might cost anywhere from $10 to $40 to fix, depending on the material of the shoe, like rubber or leather.
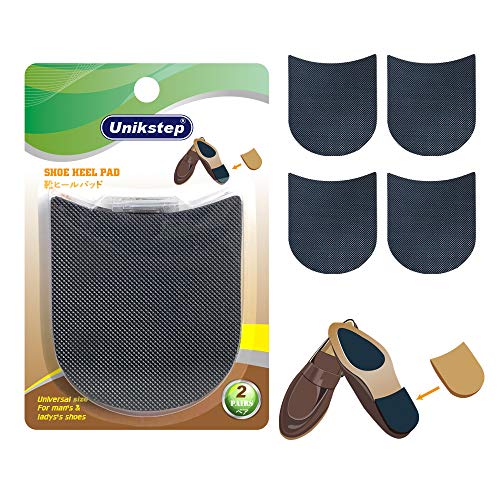
Check out these heel replacements from Unikstep 2 Pairs Shoe Heel Pads-
- For repair and protection of worn heels
- Application: Man’s leather shoes, lady’s flat shoes
- Package contains: 2 pairs (4 pcs) of heel pads,2 packs (24pcs) of nails 4 pcs of sandpapers, 4pcs of double-sided tapes
- Anti slip design and durable
- Easy to
Prices pulled from the Amazon Product Advertising API on:
Product prices and availability are accurate as of the date/time indicated and are subject to change. Any price and availability information displayed on [relevant Amazon Site(s), as applicable] at the time of purchase will apply to the purchase of this product.
Sole costs can range from around $10 to under $60 depending on quality, materials, and brand. A sole protector would normally cost at least $30, however there are several affordable options.
Check out this quality sole protector by SneakerThings 0.9mm Anti Slip-
- CLEAR PROTECTION - Helps protect the soles of your shoes from normal wear, discolouration, stains and much more.
- HIGHEST THICKNESS - 0.9mm with anti-slip skin, high adhesive quality, tear resistant, elasticity for greatest protection.
- LARGE SIZE - 6 x 14 inches (2 main pads) - Material is provided to cover any shoe size or shape. Simply trace the shape of your shoe and cut to size.
- EASY APPLICATION & INSTANT TRACTI
Prices pulled from the Amazon Product Advertising API on:
Product prices and availability are accurate as of the date/time indicated and are subject to change. Any price and availability information displayed on [relevant Amazon Site(s), as applicable] at the time of purchase will apply to the purchase of this product.
There are other shoe mending kits on the market. They are a complete set of tools that you can easily build or use to resole your boots. They cost around $30, depending on the amount and quality of tools provided.
You may securely resole your boots at home with a hammer for as little as $8 or as much as $100.
Boot repair should be simple and take only time and experience. Keep in mind that you may aggravate the state of your boots by adding more scratches, rips, putting glue in the incorrect places, or failing to line the soles with the top portions.
It may cost you more to correct the errors than the initial expenditures, which only means that if the damage is severe, then only a professional may be able to save your boots.
Replacing the damaged parts Vs purchasing a new cowboy boot
The decision to repair rather than replace your boots is motivated by more than simply cost. Different cobblers will repair the shoe in different methods and with different materials, so a less expensive repair may not be worth it.
Conversely, if the cobbler uses high-quality materials, a shoe repair may last longer than a factory job. High-quality cowboy boots can be resoled up to ten times, whereas heels may be repaired seven to ten times.
You may get more than 20 years of use out of a high-quality cowboy boot if you fix them. This makes it less expensive for you to fix your boots than to throw them away and buy new ones.
How to know if it’s time to replace heels and soles in your boots?
Although we take good care of our boots, the heels and soles must eventually give way. Leather boots are durable, but no matter how well we care for them, the heels and soles will wear out with time.
This is because it is always in contact with the floor and is subjected to the friction created while walking or working. It’s critical to mention that you should have your damaged soles and heels changed before they become completely worn out.
How to identify if your heels and soles need replacement?
To begin, insert your thumb into the centre of the heel and sole of your boots. If you notice that your sole is already spongy or weak, you should replace it.
Second, examine the bottom of your footwear carefully. If a soft round patch has formed at the bottom, it is imperative that it be replaced.
Finally, inspect the edge of your boots, specifically the layer where the welt and sole meet. If this section displays any uneven wear caused by pronation, this is another symptom that your sole needs to be changed.
Conclusion
When the heels and soles wear out, they must be replaced to make the shoes more comfortable. You may either repair the damage yourself or hire a professional if the damage is significant.
However, occasionally the repair cost is prohibitively expensive, in which case you should just get a new one.


