

When lacing up your favorite pair of work boots, the question of a right way or better way to lace them up may cross your mind.
When lacing boots, right or wrong doesn’t exist. Your lacing style comes down to your personal preferences.
What style of lacing affords you a better, more comfortable fit? What lacing up method is more convenient or easier for you to manage?
What lace-up style holds a certain aesthetic appeal for you? No one says you can’t look good and professional in work boots.
A variety of lacing methods can be used for work boots. A few may be a tad more complicated and require a little bit more time, but all things considered, it comes down to your choice of lacing up methods.
1. The Classic Criss-Cross Lacing
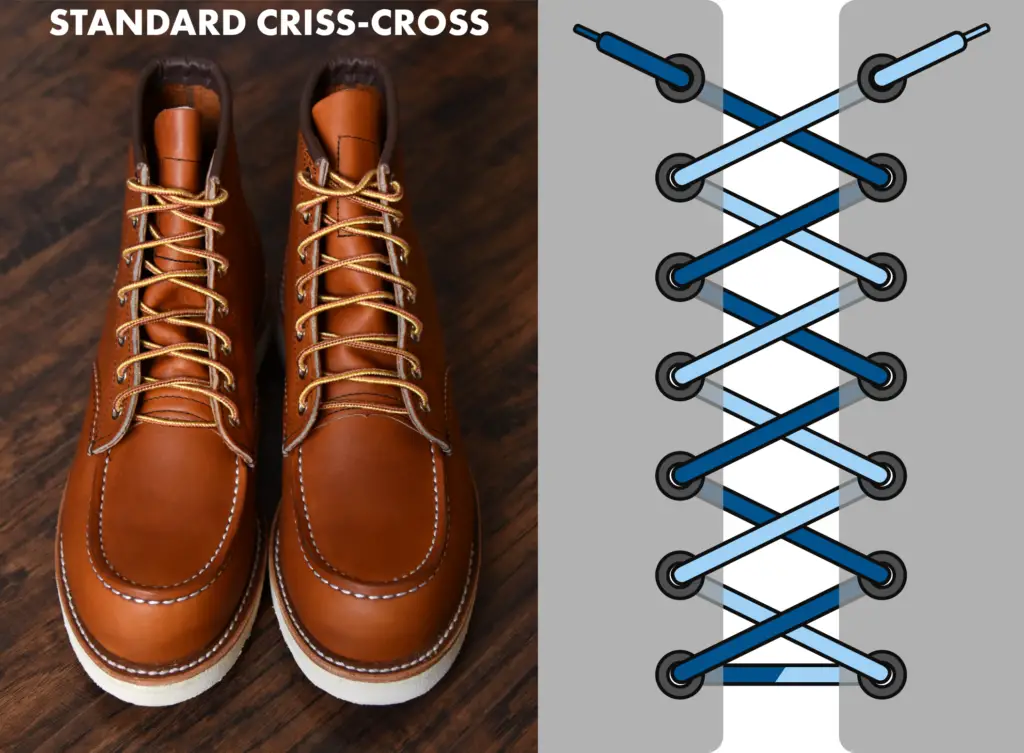
This is the method that we all probably know, and that boot manufacturers will apply when packaging a new pair of work boots.
When you go to a shoe store to purchase a new pair of boots, you’ll probably notice this lacing method as the boot is removed from its box.
Easy to use, and pretty intuitive, this is a popular method. If you are changing your lace-up style or perhaps inserting a new pair of laces, take your time and check to see that laces remain flat every time you cross them. Twisted laces can look messy regardless of the cost of the work boot.
This method also will use less lace length than other lacing methods, so if your laces prove to be on the short side, this may be your best if not only option.
1.) Insert the shoelace into the two lowest or bottom eyelets from the outside inward. Pull the lace tabs up to make sure that the lace length is equal on both sides.
2.) Pull a lace tab over the work boot tongue diagonally, then insert from the lace tab inside the next eyelet from the top. Do this on either side of your boot. It’s best to string your work boot always starting from the same side to keep the pattern looking uniform.
3.) Continue lacing the boots to the ankle or above depending on the style of your work boot. If you have excess bootlace, wind the laces around your boot top before tying them.
Pros
-
-
- An easy method for shorter laces.
-
Cons
-
-
- Not ideal for longer laces.
-
2. We’re in the Army! Military Lacing Style
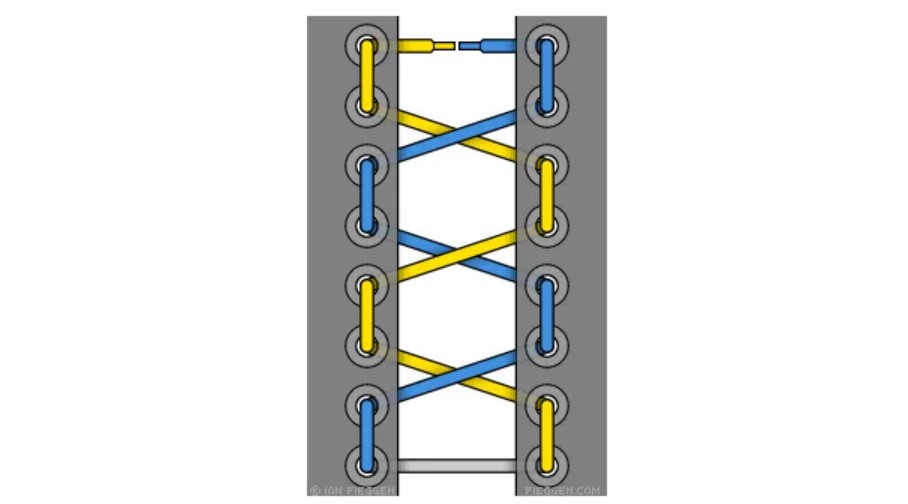
Military boots are notoriously uncomfortable. They cause blisters and general discomfort. This lacing style allows for some relaxation of boot leather, and it makes an interesting look if you use lace colors that contrast with your boot leather.
1.) If there is an even number of eyelets on your work boots begin by stringing laces from the inside to the outside.
If your boots have an uneven number lace them in the opposite direction from outside toward the inside. Pull the laces upward to check that bootlace length is pretty equal on either side.
2.) Laces should now be diagonally crossed over the boot tongue and then insert in the next eyelet from underneath on both sides. The bottom eyelets should show a straight lace across and a diagonal cross just above.
3.) Now pull your laces up and feed them through the next eyelet directly above on the same side. Do this from the outside stringing through in an inward direction on both sides. Do steps 2 and 3 until boots are completely laced up.
Pros
-
-
- Allows for some slack in boot leather.
- Creates a nice look with contrasting colored boot laces.
-
Cons
-
-
- May offer a less snug feel than other lacing methods.
-
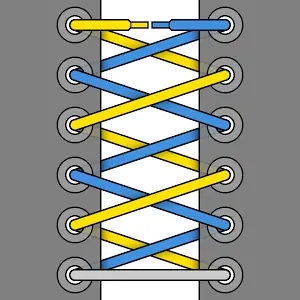
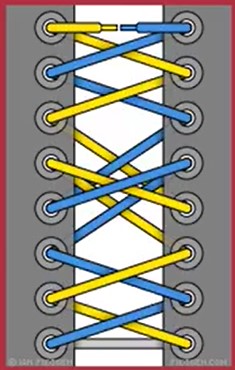
3. The Rope Ladder Lacing
This style of lacing is very secure, so if you prefer not to risk loose laces on the job, consider it. It also looks very nice when used with a contrasting color of laces. It can afford a bit more ankle support while offering a rugged twist to your professional style.
1.) Insert your laces through the bottom eyelets on your boots from the inside outward. Pull up the laces to ensure that both sides have equal amounts of a bootlace.
2.) Pull your laces across each other horizontally and twist them one time around each other and pull them taut.
3.) Insert the laces into the next vertical eyelet again from the inside of the eyelet outwards. These steps need to be completed until you have laced your entire work boot.
Pros
-
-
- This lacing style offers exceptional security with little risk of laces becoming untied.
-
Cons
-
-
- It takes some time to lace boots this way and may prove difficult to tighten laces once you have completed lacing. You will need quality laces.
-
4. Over and Under Lacing
This is a variation of the classic Criss-Cross Lacing method. It causes less friction on eyelets because rubbing is reduced due to two different levels of crosses.
1.) If your work boots feature an even number of eyelets begin lacing the bottom from the outside of the eyelet inward.
With an odd number of eyelets, begin your lacing at the bottom from inside the eyelet outward. Again, check your lace lengths vertically for equal lengths on both sides before proceeding.
2.) Supposing your work boots have an even number of eyelets, use an under-cross technique. Begin on one side by bringing the lace over the boot tongue and from the inside lace it through the eyelet on the opposite side.
Thread the lace through and do the same on the other side of the boot. For an uneven number of eyelets, reverse the instructions.
3.) Pull the bootlace diagonally across and insert it through the inside of the eyelet, outward. This should be done on the boot’s other side. Do this until the boot is completely laced up.
Pros
-
-
- Rubs less against boot leather.
-
Cons
-
-
- Less snug than other methods.
-
5. Diving In: The Paratrooper Ladder Lacing
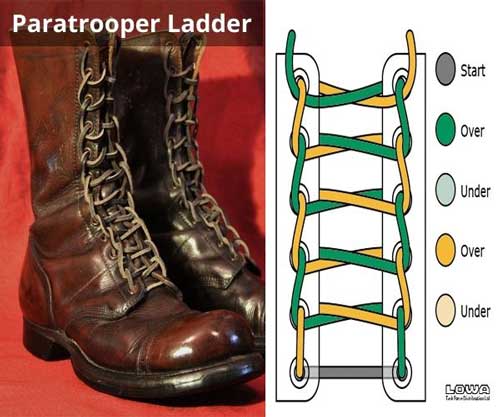
This is a very secure method often employed by US paratroopers because they are required to hit the ground running. This is an exceptional method for professionals in need of secure lacing.
1.) Beginning with the bottom eyelets thread laces from the inside outward. Pull laces vertically to check that either side has equal amounts of lace.
2.) Insert your laces in the next vertical eyelet (not horizontal). The lace will be on the work boot’s inside.
3.) Pull laces across the boot tongue, then pull through the loop that has been created by using the two vertical eyelets. You are not to thread the lace through an eyelet at this point, but only through the loop.
4.) Now insert the bootlace in the next vertical eyelet. Continue in the same order in the same direction. Do not change the order.
5.) Repeat steps 3 and 4 until boot lacing is completed.
Pros
-
-
- Exceptionally secure.
-
Cons
-
-
- A bit complicated.
-
6. Italian Flair: The Corkscrew
Italians are known for style, and lacing work boots, or any boots for that matter, is no exception. This method only requires working with one lace end and appears pretty straightforward but needs some practice.
1.) Insert the bootlace from the outside inward beginning with the bottom eyelets. The laces should appear on the boot insides.
2.) On one side the lace should only measure from five to seven inches depending on the height of your work boot. With this shorter length of lace, insert it on the top eyelet on the same boot side always from the inside outward.
3.) Take the longer side of the bootlace and insert it in the next horizontal eyelet. The short side of the bootlace should remain underneath the cross that you are forming.
4.) Continue using the long bootlace and pull across the boot to insert in the next eyelet that is parallel. Pull it through.
5.) Use only the long bootlace side to repeat the fourth and fifth steps until you arrive almost at the top of the work boot.
6.) Once you have arrived at the final eyelet at the boot ankle, the bootlace should be inside the boot. Thread the lace in the next eyelet vertically toward the outside. Both ends of the bootlaces should be approximately the same length and ready to be tied.
Pros
-
-
- Very stylish.
-
Cons
-
-
- May need some practice.
-
7. The Lace Bite 2-1-3
If you don’t like your laces too tight at the ankles, try the lace bite also known as 2-1-3 lacing. Boots should be crisscross laced normally until the final three eyelets.
When you get to the top third eyelet, do not lace it through but lace it through the middle eyelet of the top three eyelets, then lace through the top eyelet and then through the third eyelet from the boot top.
Boots should still feel secure but not tight enough to stop circulation or cause discomfort.
8. The Lacing Heel-Lock
Lace up your boots as you prefer until you arrive at the top two eyelets or hooks. When you arrive at the final two, lace vertically to the top instead of horizontally.
These final two eyelets should not feature a crisscross pattern. Now slide the lace tips across to the opposite side and underneath the vertical lines you created by lacing the last two eyelets or hooks vertically.
You can either tie your boots now or if the laces are long, wrap them around the top of your boot before tying.
Conclusion
When lacing, above all select the method that offers the most security coupled with comfort. You may want to try out several methods to find your preferred lacing style and also try out different kinds of boot laces. Support and safety are your priorities when lacing your work boots.